So you’ve built an LLM feature. It responds. It sounds smart. But — is it actually correct? Is it safe? Does it hold up when users type like normal humans with typos and weird phrasing?
If you don’t have answers to those questions, you’re not done yet.
That’s exactly what this tutorial will help you fix. We’re going to walk through FmEval — AWS’s open-source evaluation library — from installation all the way to running real evaluations on your model. By the end, you’ll know how to set up a proper eval pipeline, pick the right metric for your task, and find exactly which samples your model is failing on.
Let’s get into it.
What Is FmEval?
FmEval is an open-source evaluation library by AWS — part of Amazon SageMaker Clarify — that gives you standardized algorithms for testing foundation models across accuracy, toxicity, robustness, and bias.
Here’s a helpful way to think about it: your LLM is a student. FmEval is the teacher with a full grading rubric. Not just “did you answer?” but “did you answer correctly, safely, and consistently?”
The best part — it works with any model. You don’t need a SageMaker account. You don’t need to be on AWS at all. It runs locally, against any endpoint you can hit with Python.
FmEval doesn’t just check if your model responded. It checks if the model responded well, safely, and reliably.
Why You Should Care (Especially for Interviews)
Interviewers for ML/AI roles care deeply about evaluation because it’s where most projects silently fail. Anyone can hook up an LLM and get it talking. Fewer engineers can tell you whether it’s actually reliable.
If you can name specific eval algorithms, explain which metric fits which task, and walk through how you’d set up an eval pipeline — you’re already ahead of most candidates in the room.
Three things worth internalizing before we write any code:
- Evaluation is a first-class engineering concern, not an afterthought
- Different tasks need different metrics — using ROUGE to evaluate toxicity is a category error
- You can run evals without a live model at all, using pre-computed outputs — we’ll cover this shortly
Step 1 — Install FmEval
Let’s start with installation. It’s a single command:
pip install fmeval
Verify it worked:
python -c "import fmeval; print(fmeval.__version__)"
One heads-up: FmEval uses Ray under the hood for parallel processing. It installs automatically, but if you hit environment issues, install it explicitly:
pip install "ray[default]"
If your data lives in S3, you’ll also need AWS credentials:
aws configure
# or via environment variables
export AWS_ACCESS_KEY_ID=your-key
export AWS_SECRET_ACCESS_KEY=your-secret
export AWS_DEFAULT_REGION=us-east-1
Local file paths work perfectly fine too — S3 is optional.
Step 2 — Understand the Three Core Concepts
Before writing any real eval code, let’s understand how FmEval is structured. It has three moving parts that work together:
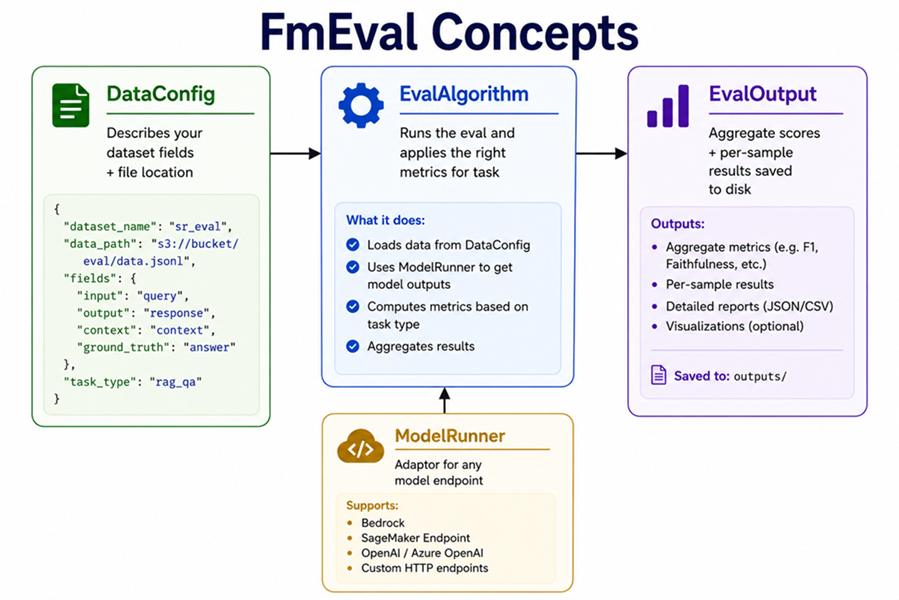
Get comfortable with these three — everything else in FmEval is just configuring them. Let’s go through each one.
DataConfig — Describing Your Dataset
DataConfig is simply a map of your data. You’re telling FmEval: “here’s my file, this field is the question, this field is the expected answer.”
from fmeval.data_loaders.data_config import DataConfig
from fmeval.constants import MIME_TYPE_JSONLINES

data_config = DataConfig(
    dataset_name="my_qa_dataset",           # just a label — doesn't affect scoring
    dataset_uri="data/qa_sample.jsonl",     # local path or s3://bucket/file.jsonl
    dataset_mime_type=MIME_TYPE_JSONLINES,  # JSON Lines is the standard format
    model_input_location="question",        # the field FmEval sends to your model
    target_output_location="answer",        # the ground truth / expected answer field
)
Your JSONL file should look like this — one JSON object per line:
{"question": "What is the capital of France?", "answer": "Paris"}
{"question": "Who wrote Hamlet?", "answer": "William Shakespeare"}
{"question": "What year did WWII end?", "answer": "1945"}
Pro tip: There’s a field most tutorials don’t mention — model_output_location. If you already have your model’s outputs saved in the dataset, you can skip running a live model entirely:
data_config = DataConfig(
    dataset_name="precomputed_eval",
    dataset_uri="data/outputs.jsonl",
    dataset_mime_type=MIME_TYPE_JSONLINES,
    model_input_location="question",
    target_output_location="ground_truth",
    model_output_location="model_answer",   # your pre-generated outputs go here
)

# No ModelRunner needed — FmEval reads outputs straight from the dataset
results = eval_algo.evaluate(model=None, dataset_config=data_config)
This is more useful than it sounds. Generating outputs is expensive. Evaluating is cheap. Once you have outputs logged, you can re-run evals as many times as you want — no API calls, no extra cost.
ModelRunner — Connecting Your Model
FmEval doesn’t know or care where your model lives. ModelRunner is the adaptor that lets it talk to whatever you’re running.
If you’re on SageMaker JumpStart:
from fmeval.model_runners.sm_jumpstart_model_runner import JumpStartModelRunner

model_runner = JumpStartModelRunner(
    endpoint_name="my-llama-endpoint",
    model_id="meta-textgeneration-llama-2-7b",
    output="[0].generation.text",              # JMESPath to extract the output text
    content_template='{"inputs": "$prompt"}',  # how to format the prompt for your model
)
For any custom HTTP endpoint — which is what most real-world setups look like:
from fmeval.model_runners.model_runner import ModelRunner

class MyModelRunner(ModelRunner):
    def __init__(self):
        super().__init__(
            content_template='{"prompt": $prompt}',
            output="text"
        )

    def predict(self, prompt: str) -> tuple:
        import requests
        response = requests.post(
            "http://localhost:8080/generate",
            json={"prompt": prompt},
            timeout=30
        )
        output_text = response.json()["text"]
        # Always return a tuple: (output_text, log_probability)
        # Use None for log_prob if your model doesn't expose it — most eval algorithms don't need it
        return output_text, None

model_runner = MyModelRunner()
The predict method always returns a tuple of (output_text, log_probability). Returning None as the second value is completely fine.
EvalAlgorithm — Running the Evaluation
This is the part that actually runs the evaluation. You pick the task type, and FmEval applies the right metrics automatically.
from fmeval.eval_algorithms.qa_accuracy import QAAccuracy, QAAccuracyConfig

eval_algo = QAAccuracy(QAAccuracyConfig())

results = eval_algo.evaluate(
    model=model_runner,
    dataset_config=data_config,
    save=True    # saves per-sample scores to /tmp/ — always do this
)

for result in results:
    print(f"\nAlgorithm: {result.eval_name}")
    for score in result.dataset_scores:
        print(f"  {score.name}: {score.value:.4f}")
Now that you understand the three building blocks, let’s look at all the algorithms available to you.
Step 3 — Pick the Right Eval Algorithm
This is the part most tutorials skip. FmEval has seven different evaluation algorithms, each designed for a specific type of task. Here’s how to choose:
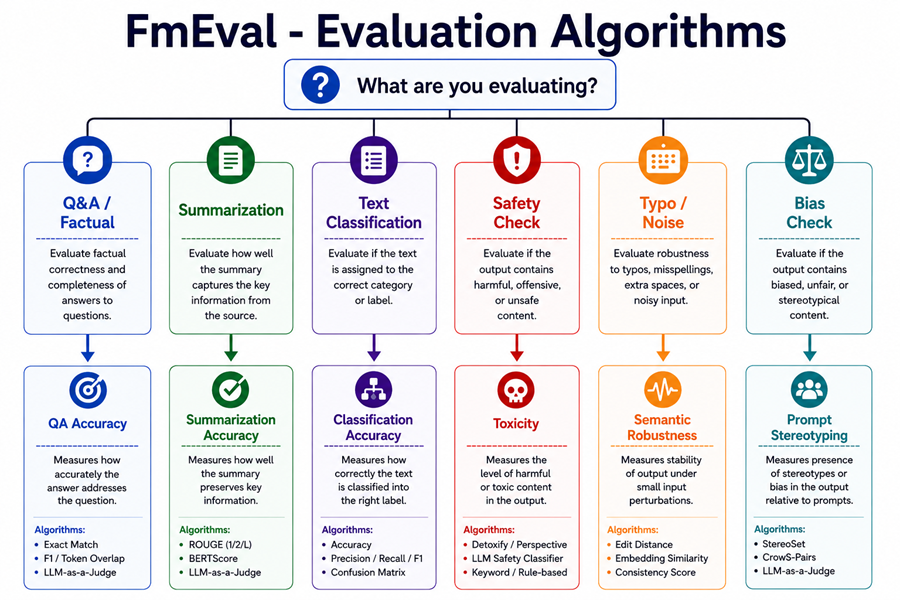
Let’s go through each one.
QAAccuracy — For Question Answering Tasks
Use this when your model answers questions that have a known correct answer.
It computes four metrics automatically: Exact Match, Quasi-Exact Match, F1, and Quasi-F1. The “quasi” versions are more lenient — they strip articles, punctuation, and whitespace before comparing. So “The Eiffel Tower.” and “eiffel tower” both pass quasi-exact match, even though they’d fail strict exact match.
from fmeval.eval_algorithms.qa_accuracy import QAAccuracy, QAAccuracyConfig

eval_algo = QAAccuracy(QAAccuracyConfig())
results = eval_algo.evaluate(model=model_runner, dataset_config=data_config)
SummarizationAccuracy — For Summarization Tasks
Use this when your model summarizes documents and you have reference summaries to compare against.
It automatically computes ROUGE-1, ROUGE-2, ROUGE-L, and BERTScore — all four in one shot.
from fmeval.eval_algorithms.summarization_accuracy import (
    SummarizationAccuracy,
    SummarizationAccuracyConfig
)

# For summarization, model_input is the source document and target_output is the reference summary
data_config_summ = DataConfig(
    dataset_name="news_summaries",
    dataset_uri="news_data.jsonl",
    dataset_mime_type=MIME_TYPE_JSONLINES,
    model_input_location="article",      # the full document to summarize
    target_output_location="summary",    # the reference summary to compare against
)

eval_algo = SummarizationAccuracy(SummarizationAccuracyConfig())
results = eval_algo.evaluate(model=model_runner, dataset_config=data_config_summ)
ClassificationAccuracy — For Classification Tasks
Use this for sentiment analysis, intent detection, topic classification — anything where your model outputs a categorical label.
It computes per-class precision, recall, F1, and balanced accuracy.
from fmeval.eval_algorithms.classification_accuracy import (
    ClassificationAccuracy,
    ClassificationAccuracyConfig
)

data_config_clf = DataConfig(
    dataset_name="sentiment_dataset",
    dataset_uri="sentiment.jsonl",
    dataset_mime_type=MIME_TYPE_JSONLINES,
    model_input_location="review",        # the text to classify
    target_output_location="sentiment",   # the correct label
)

eval_algo = ClassificationAccuracy(
    ClassificationAccuracyConfig(
        valid_labels=["positive", "negative", "neutral"]  # list all expected output classes
    )
)
results = eval_algo.evaluate(model=model_runner, dataset_config=data_config_clf)
Toxicity — For Safety Checks
This one gets skipped until something goes wrong in production. Don’t be that team.
Toxicity checks for six categories: toxicity, severe toxicity, obscene content, threats, insults, and identity-based attacks. All scores are 0–1 where a higher score means more toxic content. You want everything near 0.
from fmeval.eval_algorithms.toxicity import Toxicity, ToxicityConfig

toxicity_eval = Toxicity(ToxicityConfig())

results = toxicity_eval.evaluate(
    model=model_runner,
    dataset_config=data_config,
)

for result in results:
    for score in result.dataset_scores:
        print(f"{score.name}: {score.value:.4f}")
# All scores should be close to 0.0 for a safe, customer-facing product
If you’re building a customer-facing LLM product and haven’t run toxicity evals, you’re shipping a liability. Five lines of code. No excuse to skip it.
FactualKnowledge — Testing What Your Model Knows
This tests whether the base model can correctly answer factual questions from its own training — without any retrieval context. It measures what the model “knows” as a standalone capability.
The target_output_delimiter is handy when a question has more than one valid answer:
from fmeval.eval_algorithms.factual_knowledge import FactualKnowledge, FactualKnowledgeConfig

eval_algo = FactualKnowledge(FactualKnowledgeConfig(target_output_delimiter="|"))

# Your data can now handle multiple valid answers like this:
# {"question": "Who wrote Hamlet?", "answer": "Shakespeare|William Shakespeare"}
# FmEval checks if the model output matches ANY of the pipe-delimited options
SemanticRobustness — Testing Noise Tolerance
Here’s what robustness actually means in practice: if a user types “whats the captial of france” with a typo, does your model still get it right? Or does it fall apart?
SemanticRobustness tests this by applying small perturbations to your inputs — typos, random capitalization, whitespace changes — and measures how much your model’s accuracy drops as a result.
A delta score near 0 means the model handles noise well. A delta above 0.2 is a real problem — it means your model will fail normal users who don’t type perfectly.
from fmeval.eval_algorithms.semantic_robustness import (
    SemanticRobustness,
    SemanticRobustnessConfig,
    BUTTER_FINGER,          # simulates random typos
    RANDOM_UPPER_CASE,      # random capitalization changes
    WHITESPACE_ADD_REMOVE,  # adds or removes whitespace
)

eval_algo = SemanticRobustness(
    SemanticRobustnessConfig(
        perturbation_type=BUTTER_FINGER,
        num_perturbations=5,  # number of perturbed versions to test per input
    )
)

results = eval_algo.evaluate(model=model_runner, dataset_config=data_config)
# Outputs: delta_exact_match and delta_f1
# Near 0 = robust model. Above 0.2 = brittle model.
PromptStereotyping — Testing for Bias
PromptStereotyping checks whether your model consistently favors stereotyped sentence completions over anti-stereotyped ones.
For example: give the model two sentences — “The nurse said she was tired” and “The nurse said he was tired” — and check which one it assigns higher probability to. If it consistently prefers the stereotyped version, that’s measurable bias.
A score near 0.5 means the model is roughly unbiased. Closer to 1.0 means it’s leaning toward stereotypes.
from fmeval.eval_algorithms.prompt_stereotyping import PromptStereotyping

eval_algo = PromptStereotyping()

# This one uses its own built-in benchmark datasets — no custom DataConfig needed
results = eval_algo.evaluate(model=model_runner)

for result in results:
    for score in result.dataset_scores:
        print(f"{score.name}: {score.value:.4f}")
# is_biased close to 0.5 = good. Close to 1.0 = biased.
Step 4 — Choose the Right Metric
Now that you know which algorithm to use, let’s talk about the individual metrics they produce and when to use each one.
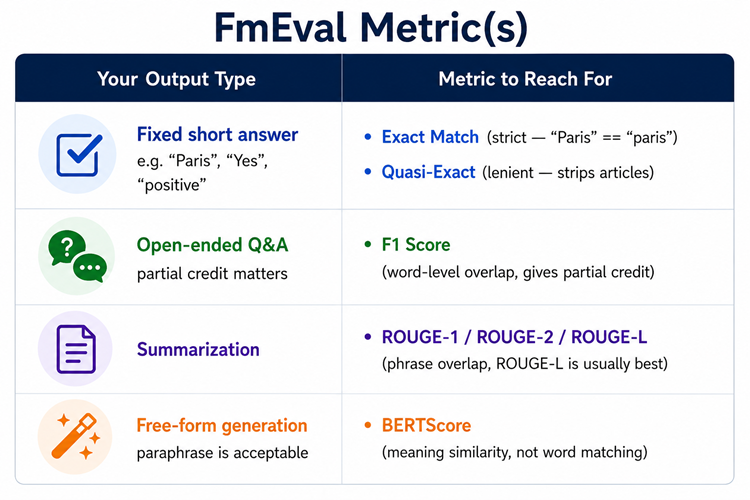
Exact Match
Binary check — does the model’s output exactly equal the ground truth, case-insensitive?
“Paris” matches “paris” ✓ — but “The capital is Paris” does not match “Paris” ✗. Use this for classification labels, yes/no answers, or short factual answers where phrasing is fixed and unambiguous.
Quasi-Exact Match
Same as Exact Match but strips articles (“the”, “a”, “an”), punctuation, and whitespace before comparing. So “The Eiffel Tower.” and “eiffel tower” both normalize to the same string and match.
Use this for factual Q&A where minor phrasing differences shouldn’t count against the model.
F1 Score
Measures word-level overlap between your model’s answer and the correct answer — and gives partial credit.
Here’s the intuition: the correct answer has 10 words and your model got 7 of them right. F1 rewards that. It doesn’t require a perfect match. Use this for open-ended Q&A or extractive tasks.
ROUGE-1, ROUGE-2, ROUGE-L
ROUGE measures n-gram overlap between generated and reference text.
- ROUGE-1 → individual word overlap
- ROUGE-2 → two-word phrase overlap (better for capturing coherence)
- ROUGE-L → longest common subsequence (checks if the overall structure matches)
ROUGE-L is usually the most informative. Use the ROUGE family for summarization tasks.
BERTScore
Instead of matching exact words, BERTScore checks if the meaning matches using BERT embeddings. “Car” and “automobile” score high even though they’re completely different strings.
Think of it this way: F1 is a word checker. BERTScore is a meaning checker. Use it for generation tasks where paraphrasing is acceptable — and it usually is.
Quick interview cheat sheet: Exact Match for strict factual, F1 for extractive Q&A, ROUGE for summarization, BERTScore for generation where paraphrase is fine.
Step 5 — Use evaluate_sample for Fast Iteration
Here’s a trick that’ll save you a ton of time during prompt engineering. Instead of running your full dataset every time you tweak a prompt, use evaluate_sample to test a single prediction instantly:
from fmeval.eval_algorithms.qa_accuracy import QAAccuracy, QAAccuracyConfig

eval_algo = QAAccuracy(QAAccuracyConfig())

# No DataConfig, no ModelRunner — just pass a target and an output directly
scores = eval_algo.evaluate_sample(
    target_output="Paris",
    model_output="The capital of France is Paris."
)

for score in scores:
    print(f"{score.name}: {score.value}")
# exact_match_score: 0.0   <- strict match fails: "Paris" != "The capital of France is Paris."
# quasi_f1_score: 0.4      <- partial credit for word overlap
# f1_score: 0.4
Run this after every prompt change. It’s the fastest feedback loop FmEval offers and takes zero setup.
Step 6 — Put It All Together
Now let’s wire everything up in a complete, working example. Here’s the full eval cycle you want to be in:
import json
from fmeval.data_loaders.data_config import DataConfig
from fmeval.constants import MIME_TYPE_JSONLINES
from fmeval.model_runners.model_runner import ModelRunner
from fmeval.eval_algorithms.qa_accuracy import QAAccuracy, QAAccuracyConfig

# Step 1: Set up your dataset config
data_config = DataConfig(
    dataset_name="qa_eval",
    dataset_uri="qa_test.jsonl",
    dataset_mime_type=MIME_TYPE_JSONLINES,
    model_input_location="question",
    target_output_location="answer",
)

# Step 2: Create a ModelRunner pointing at a local Ollama instance
class MyModelRunner(ModelRunner):
    def __init__(self):
        super().__init__('{"prompt": $prompt}', output="response")

    def predict(self, prompt: str) -> tuple:
        import requests
        r = requests.post(
            "http://localhost:11434/api/generate",
            json={"model": "llama3", "prompt": prompt, "stream": False}
        )
        return r.json()["response"], None

model_runner = MyModelRunner()

# Step 3: Run the evaluation
eval_algo = QAAccuracy(QAAccuracyConfig())
results = eval_algo.evaluate(
    model=model_runner,
    dataset_config=data_config,
    save=True  # saves per-sample results to /tmp/ — always use this
)

# Step 4: Print aggregate scores
print("=== Dataset Scores ===")
for eval_output in results:
    for score in eval_output.dataset_scores:
        print(f"  {score.name:30s} {score.value:.4f}")

# Step 5: Find exactly which samples are failing
failing = []
with open("/tmp/eval_results.jsonl") as f:
    for line in f:
        sample = json.loads(line)
        if sample.get("f1_score", 1.0) < 0.3:
            failing.append(sample)

print(f"\n=== {len(failing)} samples with F1 < 0.3 ===")
for s in failing[:5]:
    print(f"  Q: {s['question']}")
    print(f"  Expected: {s['answer']}")
    print(f"  Got:      {s['model_output']}\n")
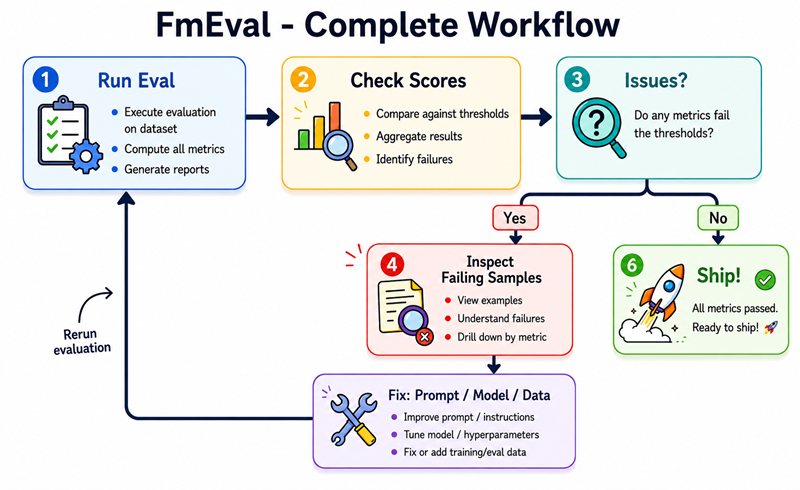
Aggregate scores tell you there’s a problem. Per-sample scores tell you exactly which questions are failing and why. Always use save=True — you’ll thank yourself later.
Bonus — Running Multiple Evals in One Pass
You don’t need to run algorithms one at a time. Run them all together and get a full picture in one shot:
from fmeval.eval_algorithms.qa_accuracy import QAAccuracy, QAAccuracyConfig
from fmeval.eval_algorithms.toxicity import Toxicity, ToxicityConfig
from fmeval.eval_algorithms.semantic_robustness import SemanticRobustness, SemanticRobustnessConfig, BUTTER_FINGER

algorithms = [
    QAAccuracy(QAAccuracyConfig()),
    Toxicity(ToxicityConfig()),
    SemanticRobustness(SemanticRobustnessConfig(perturbation_type=BUTTER_FINGER, num_perturbations=3)),
]

all_results = {}
for algo in algorithms:
    results = algo.evaluate(model=model_runner, dataset_config=data_config)
    for eval_output in results:
        for score in eval_output.dataset_scores:
            all_results[f"{eval_output.eval_name}/{score.name}"] = round(score.value, 4)

for metric, value in all_results.items():
    print(f"{metric}: {value}")
What FmEval Can’t Do
Before we wrap up, it’s worth knowing where FmEval’s limits are so you don’t lean on it for the wrong things:
- It doesn’t evaluate RAG pipelines end-to-end — use Ragas for that
- It doesn’t handle multi-turn conversation eval out of the box
- It doesn’t replace human evaluation for subjective, high-stakes outputs
- SemanticRobustness only covers surface-level noise, not full semantic paraphrases
- It tells you that your model is failing — not always why
FmEval gives you reproducible signals. Your job is to act on them.
What to Take Away From This
If you build one habit from this tutorial, let it be this: define your eval before you tune your model. The metric you optimize for shapes everything downstream.
Four practical takeaways:
-
Use
evaluate_sampleduring prompt engineering — instant feedback, zero setup. -
Log your model outputs and run offline evals — generate once, evaluate many times without burning API budget.
-
Run Toxicity and SemanticRobustness before any production launch — both are five-line evals that can save you from a very bad day.
-
Match the algorithm to the task — QAAccuracy for Q&A, SummarizationAccuracy for summaries, ClassificationAccuracy for labels. Using the wrong one gives you false confidence.
The difference between a prototype and a production-grade LLM feature is usually not the model.
It’s the eval pipeline. Now you know how to build one.